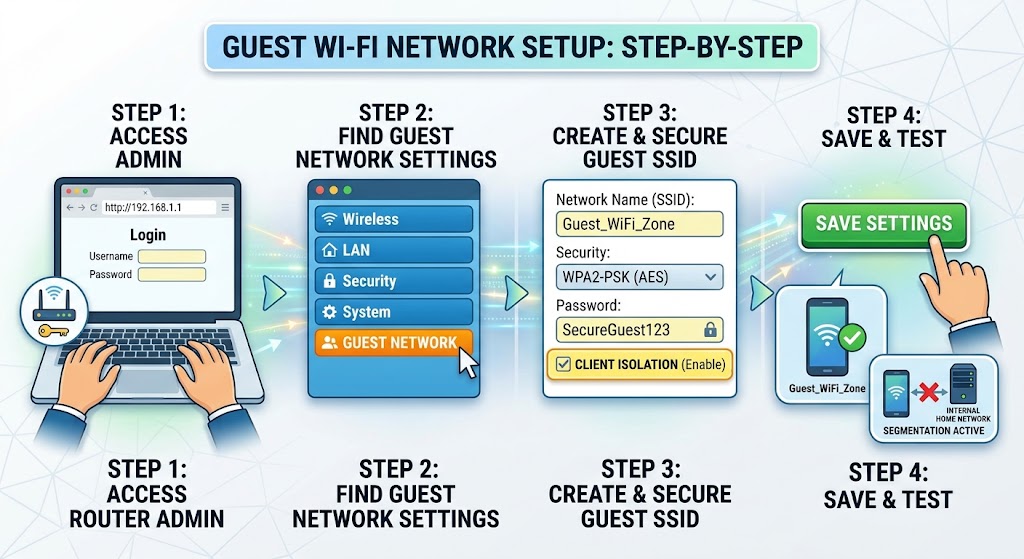
Guest Wi-Fi network setup takes about ten minutes, and it is one of the easiest security upgrades you can make at home. A guest network is a second, separate Wi-Fi network that gives visitors internet access without letting them (or their phones, laptops and whatever else is on them) see your computers, files, printers and cameras. It is also the simplest way to build a separate IoT network for smart plugs, TVs and other gadgets that you do not fully trust. This guide shows you how to set up a router guest network on most routers, mesh systems and internet provider gateways, what each setting means, how to test that it is really isolated, and how to fix the usual problems.
Guest Wi-Fi Network Setup at a Glance
- What it is: A second Wi-Fi network (with its own name and password) that can reach the internet but not your main home network.
- Why bother: Visitors never need your main password, risky or neglected smart devices are kept away from your computers, and you can limit speed, time and access.
- How long it takes: About 10 to 15 minutes for most routers.
- What you need: Your router’s admin login, a device on your home network, and a new network name and password.
- The key setting: Make sure guest devices are isolated from your local network. Some routers call this “client isolation,” “AP isolation,” “intranet access off” or “allow guests to access my local network” (leave that one off).
- Always test it: Connect a phone to the guest network and confirm it can browse the web but cannot reach your router’s admin page or your other devices.
What Is a Guest Wi-Fi Network?
A guest Wi-Fi network is a separate wireless network broadcast by your router or access points. It usually has its own network name (SSID), its own password, and its own rules. The most important rule is that devices connected to it can talk to the internet but are blocked from talking to the devices on your main (also called “private” or “trusted”) network.
On a typical home network without a guest network, every connected device sits in the same neighborhood. A laptop, a smart TV, a baby monitor and a visitor’s phone can all, in principle, reach each other. If one of them is infected or poorly secured, it may be able to probe or attack the others. A guest network puts a wall between the groups.
Guest Network vs Main Network vs IoT Network
| Network | Who or what uses it | Trust level | Typical rules |
| Main (private) network | Your computers, phones, NAS, printers, work devices | High | Strong WPA2/WPA3 password, access to local devices |
| Guest network | Visitors, babysitters, short-term guests | Low | Internet only, no access to local devices, optional time and speed limits |
| IoT network | Smart plugs, bulbs, TVs, speakers, cameras, appliances | Low to medium | Internet access, limited or no access to the main network |
Many home routers offer only a guest network, so people use it for both visitors and smart devices. That is fine as a starting point. If you want a true separate IoT network with its own rules, you will need a router or mesh system that supports multiple networks (SSIDs) or VLANs. Both approaches are covered below.
Why You Should Set Up a Guest Wi-Fi Network
Protect Your Main Devices
Visitors bring devices you know nothing about. They might have outdated software, risky apps or malware. On a guest network, an infected phone cannot scan your network for shared folders, cameras or computers.
Keep Your Main Password Private
Once you give someone your Wi-Fi password, you have little control over who else gets it. Guests may share it, save it on several devices or leave it written on a note. A guest password can be changed in seconds without disrupting your own devices.
Isolate Smart Home and IoT Devices
Smart gadgets are convenient but often receive few security updates and sometimes have weak default settings. Putting them on a separate network limits the damage if one is compromised. A hacked light bulb should not be able to reach your laptop.
Control Bandwidth and Access
Many routers let you cap guest speeds, schedule when the network is available, set a time limit, or filter content. That keeps a visitor’s large download from slowing your video calls.
Reduce Your Liability
If a guest does something illegal or abusive online, it can appear to come from your internet connection. A guest network does not remove your responsibility, but it lets you apply filtering, limits and logging, and you can turn it off completely when you do not need it.
Make Life Easier
You can share a simple guest password, or a QR code, without ever revealing the main one. When the visit is over, change the password and everyone is out.
Before You Start: What You Need
- Your router’s admin address and login. Look for a sticker on the router with the admin address and default login, or check the router’s app. If you changed the password and forgot it, you may need to reset the router to factory settings, which will erase your Wi-Fi settings, so use that only as a last resort.
- A device connected to your home network (computer, phone or tablet).
- A plan for the network name and password (see Step 4).
- About ten minutes, and ideally a moment when no one is in the middle of a video call, since changing settings may briefly drop the connection.
- Updated router firmware. Check for updates first, because guest network features and security fixes arrive through firmware.
How to Find Your Router’s Admin Page
Router addresses vary. Common ones include:
- 192.168.0.1
- 192.168.1.1
- 10.0.0.1
- 192.168.50.1 (common on some ASUS routers)
- Friendly addresses such as routerlogin.net (many Netgear routers), tplinkwifi.net (many TP-Link routers) and router.asus.com (ASUS)
If none works, find your default gateway:
- Windows: open Command Prompt and type ipconfig, then look for “Default Gateway.”
- macOS: open System Settings, go to Network, select your connection, open Details and look at the router address.
- iPhone: open Settings, Wi-Fi, tap the info icon beside your network and look for “Router.”
- Android: open Wi-Fi settings, tap your network and look for the gateway.
Type that address into a web browser while connected to your home network.
Guest Wi-Fi Network Setup: Step-by-Step Instructions
Step 1: Log In to Your Router
- Connect to your home Wi-Fi or plug in with an Ethernet cable.
- Open a web browser and enter your router’s address, or open the router’s mobile app if it uses one (many mesh systems do).
- Enter the admin username and password. Choose a strong admin password if you are still using the default, because the default is easy for others to guess.
Step 2: Update the Router Firmware
Look for a “Firmware,” “Software Update” or “Administration” section. If an update is available, install it and let the router restart. This improves stability and closes known security holes. Some routers update automatically, so you may already be current.
Step 3: Find the Guest Network Settings
The exact name and location differ by brand. Look for terms such as:
- Guest Network
- Guest Wi-Fi
- Guest Access
- Wireless, then Guest
- Network, then Guest Network
- Smart Wi-Fi Tools
- Advanced, then Guest Network
The table below shows where you can often find it. These are typical locations and may differ depending on your model and firmware version, so treat them as a starting point.
| Router or System | Where to Look (typical) |
| Netgear (Nighthawk) | Advanced, then Setup, then Guest Network; or Basic, then Guest Network |
| TP-Link (Archer) | Basic, then Guest Network; or Wireless, then Guest Network |
| TP-Link Deco (mesh) | In the Deco app: More, then Wi-Fi, then Guest Network |
| ASUS | Guest Network (left menu); or the AiMesh and app guest options |
| Linksys | Guest Access, or the Linksys app guest section |
| eero (mesh) | In the eero app: Settings, then Network Settings, then Guest Network |
| Google Nest Wifi / Google Wifi | In the Google Home app: Wi-Fi, then Settings, then Guest network |
| Netgear Orbi | Basic, then Guest Network, or the Orbi app |
| Ubiquiti UniFi | Settings, then WiFi, create a new network and enable guest isolation or use the guest profile |
| Xfinity, Spectrum, AT&T and other ISP gateways | The provider’s app or web portal; look for Guest Wi-Fi or WiFi settings |
If you cannot find a guest option, your router may not support it, or it may be hidden under “Advanced.” Check the manual or manufacturer’s support site for your exact model. Very old routers may lack the feature, which is a good reason to consider replacing them.
Step 4: Choose a Network Name (SSID)
Pick a name that is clear and does not reveal personal details. Good examples:
- HomeNetwork-Guest
- Smith-Guest
- Guest-WiFi
Avoid using your full name, address, apartment number or anything that identifies your family. Avoid names that suggest valuable gear. It is smart to keep the guest name recognizably different from your main network name so no one connects to the wrong one by mistake.
Step 5: Set the Security Mode and a Strong Password
Security mode matters. Choose the strongest option your router and guests’ devices support:
- WPA3 is the newest standard and the best choice where available.
- WPA2 (AES), sometimes labeled WPA2-PSK [AES], is still widely used and secure with a strong password.
- WPA2/WPA3 mixed mode works for a range of devices.
- Avoid WEP and WPA (the original), and avoid “Open” networks without a good reason.
- Turn off WPS (Wi-Fi Protected Setup) if your router lets you, because it has known weaknesses.
Create a password that is long and easy to read aloud. A few unrelated words with a number or two works well, for example “blue-kettle-sunrise-42.” Aim for at least 12 characters. Do not reuse your main Wi-Fi password, your router admin password or any other account password.
Some routers also let you create an open guest network with a “captive portal” login page. That is common for businesses, and less necessary at home.
Step 6: Turn On Guest Network Isolation
This is the most important step for security. Without it, a guest network might simply be a second name for the same network.
Look for settings with names like:
- Allow guests to access my local network: set to Off or Disabled.
- Intranet access or Access to local network: Disabled.
- AP isolation or Client isolation: Enabled (this stops guest devices from seeing each other).
- Allow guests to see each other: Disabled.
Not every router uses the same wording, and some isolate guests automatically. If you cannot find an option, do not assume it is isolated. Test it in Step 10.
Step 7: Set Optional Limits (Speed, Time and Schedule)
Depending on your router, you may be able to set:
- Bandwidth limits: Cap guest download and upload speeds so they cannot use up your whole connection.
- Time limits: Automatically shut off the guest network after a set number of hours.
- Schedules: Make the guest network available only during certain times, for example when you have visitors or only in the evening.
- Maximum number of devices: Prevent a huge number of guests from connecting at once.
- Parental controls or content filtering: Block categories of websites on the guest network.
These controls help with fairness and security, and they cost nothing.
Step 8: Pick Wi-Fi Bands
Many routers broadcast guest networks on both the 2.4 GHz and 5 GHz bands, and newer ones may add 6 GHz. Some let you choose.
- 2.4 GHz has longer range and better wall penetration, and is required by many smart devices.
- 5 GHz is faster for phones and laptops.
- 6 GHz (Wi-Fi 6E and Wi-Fi 7) offers more capacity but shorter range, and not all devices support it.
For visitors, enabling both 2.4 GHz and 5 GHz is usually best. For a dedicated IoT network, 2.4 GHz is often essential because many smart plugs and bulbs support only that band.
Step 9: Save and Apply, Then Connect a Test Device
- Enable the guest network.
- Click Save or Apply. The router may restart its Wi-Fi, which can briefly disconnect devices.
- After a minute, use a phone or laptop to find the guest network name and connect with the new password.
Step 10: Test That the Guest Network Is Really Isolated
Never skip testing. A guest network that does not isolate gives a false sense of security.
Run these checks while connected to the guest network:
- Confirm internet access. Open a website or run a speed test.
- Try to open your router’s admin page (for example, 192.168.1.1). It should fail or not load, or at least require your admin login if the router permits guest access to it. Ideally guests cannot reach it at all.
- Try to reach a device on your main network. For example, type the IP address of a printer or NAS into a browser or use a network scanner app. You should not be able to see or connect to it.
- Try to ping a main-network device from the guest device (advanced). It should not respond.
- If you have two guest devices, try connecting them to each other. With client isolation on, they should not communicate.
- Switch back to your main network and verify that everything there still works.
If a guest device can reach your main devices, revisit Step 6, check for firmware updates and read the manual. If the router cannot isolate guests properly, consider upgrading it or using a different approach.
Step 11: Share the Password the Safe Way
- Print or write down the guest password and keep it by the door or in a drawer, rather than giving out the main one.
- Share it by QR code. Many routers and apps generate a QR code. Phones can also create one: on iPhone you can share a Wi-Fi password to a nearby contact, and on Android you can create a QR code from Wi-Fi settings.
- Change the password periodically, and always after a large gathering or a visitor you did not know well.
- Turn the guest network off entirely if no one needs it.
Setting Up a Separate IoT Network
Smart devices deserve their own network. Here are the two common approaches.
Option A: Use the Guest Network for IoT Devices
This is the easiest option. Connect smart plugs, bulbs, speakers and TVs to the guest network, and keep your computers and phones on the main one. Many devices work fine because they only need the internet.
Pros:
- No extra hardware
- Quick to set up
- Strong separation from your main devices
Cons:
- Guests and IoT devices share the same network
- Some devices need to talk to your phone or hub locally and will not work when isolated
- You may have to share the guest password with devices, so plan to change it only when needed
Option B: Create a Dedicated IoT Network (Multiple SSIDs or VLANs)
If your router or mesh system supports additional SSIDs, create one named something like “Home-IoT,” with its own password and isolation. Better equipment (such as UniFi, TP-Link Omada, OPNsense, pfSense, MikroTik, and some ASUS, Netgear and eero models) lets you create VLANs and firewall rules, so you can decide exactly what each network can reach.
Typical IoT firewall rules:
- Allow IoT devices to reach the internet
- Block IoT devices from starting connections to your main network
- Allow your main network to reach the IoT network when needed (for example, to control a device)
- Allow only specific exceptions, such as a hub, printer or media server
This is more work and requires some networking knowledge. It is also the most flexible approach.
Smart Devices That May Not Work on an Isolated Network
Isolation sometimes breaks features that rely on devices discovering each other locally. Examples include:
- Casting from a phone to a Chromecast or smart TV (the phone and the receiver usually need to be on the same network)
- AirPlay and some speaker systems
- Printers (wireless printing often needs to be on the same network)
- Smart home hubs and bridges that your phone connects to directly
- Matter and Thread devices, which often need your controller and devices to share a network or be linked through a border router
- Game consoles that need open local connections for multiplayer
- Network storage and media servers
Fixes:
- Put the phone and the casting device on the same network. For example, put the TV and your phone on the IoT network, or both on the main network.
- Allow specific exceptions on the router if it supports firewall rules.
- Use a router feature called mDNS reflector, Bonjour gateway or “multicast forwarding” to let discovery traffic cross networks, if your equipment supports it.
- Place the hub on the main network while leaving cloud-only gadgets on the IoT network.
- If something refuses to work, put it back on the main network and weigh the risk and convenience.
Cloud-based devices such as many smart plugs, doorbells and cameras often work fine on an isolated network because your phone talks to them through the manufacturer’s servers. Check the manufacturer’s guidance for each device.
Guest Wi-Fi Network Setup on Mesh Systems and ISP Gateways
Mesh Wi-Fi Systems
Most mesh systems make guest networks simple. You enable the feature in the app, choose a name and password, and the guest network is broadcast by every node automatically. Check for settings such as local access, device limits or time limits. Because the setup happens in an app, make sure you have installed it and are signed in as the account owner or administrator.
ISP-Provided Routers and Gateways
Internet providers often supply a combined modem and router. These usually offer guest Wi-Fi in the provider’s app or admin portal, though options are sometimes limited. If you want advanced features like VLANs or an IoT network, you may need to add your own router.
Using Your Own Router Behind an ISP Gateway
If you plug your own router into the provider’s gateway, you might create “double NAT,” where two routers each separate the network. In that case:
- A guest network on the provider’s gateway may not isolate devices that sit behind your own router.
- A guest network created on your own router isolates only devices connected to your router.
- The best fix is to put the provider’s gateway into “bridge mode” (if available), so your own router handles routing and guest settings. Ask your provider how to enable it.
Using Access Points
If you use a wired access point or mesh nodes connected by Ethernet to a main router, check where the guest network is controlled. In a router-plus-access-point setup, the router is typically responsible for isolation, and the access point must support guest VLANs. Consult your equipment’s documentation.
Advanced Guest Network Settings Explained
DHCP Range and IP Addressing
Guest networks usually have their own IP address range (for example 192.168.100.x or 10.10.10.x), distinct from your main network (such as 192.168.1.x). That separation is part of how isolation works. You normally do not need to change it.
DNS Settings and Content Filtering
You can configure the guest network to use a filtering DNS service that blocks malicious or adult sites. Several public DNS providers offer security and family filtering options. Use a reputable service, check its current addresses on its official website, and test after changing it. Some routers also have built-in filtering or parental controls.
Captive Portals and Vouchers
Businesses, cafes and rentals may use a captive portal, a login page that appears when guests connect, to display terms of use or collect a voucher code. This is generally overkill at home, but useful for a short-term rental or a small office.
Firewall Rules and VLANs
Advanced routers can create virtual LANs (VLANs) for guests and IoT with their own firewall rules. This provides stronger, more flexible segmentation than a basic guest toggle, and is common in small business and home-lab setups.
Logging and Monitoring
Some routers log connected devices and traffic summaries. Reviewing the client list occasionally helps you spot unknown devices on your main network or odd activity on the guest network.
Guest Wi-Fi Network Security Best Practices
- Keep your router firmware up to date, and turn on automatic updates if available.
- Change the default admin password and username if the router lets you.
- Use WPA3 or WPA2 (AES) with strong, unique passwords on every network.
- Disable WPS and remote administration (access to the admin page from the internet) unless you truly need them.
- Turn off UPnP if you do not need it, since it can open ports automatically.
- Keep guest networks isolated and test them after major firmware updates.
- Use a separate network name for each network so devices do not mix them up.
- Rotate the guest password regularly and after large events.
- Disable the guest network when it is not in use.
- Do not run work-from-home devices or sensitive accounts on a guest or IoT network. Put them on the main network, ideally with a strong firewall.
- Retire end-of-life routers that no longer receive updates.
- Record your settings in a safe place so you can restore them after a reset.
Troubleshooting Guest Wi-Fi Network Problems
My router has no guest network option. Check for a firmware update. If your model truly lacks the feature, consider a new router or mesh system, or add an access point that supports guest networks.
Guests can connect but have no internet. Make sure the guest network is enabled and not blocked by schedules or time limits. Restart the router, check that your main network has internet and look for DNS settings that may have been entered incorrectly.
Guests can see my printer or other devices. Isolation is not working. Turn off the “allow guests to access local network” option, turn on AP or client isolation and check for firmware updates. Test again. If your router cannot isolate the guest network properly, consider replacing it.
My smart devices will not connect to the guest network. Many smart devices work only on 2.4 GHz. Make sure the guest network offers 2.4 GHz, and that the network name has no unusual characters. Some devices dislike WPA3 or mixed modes, so try WPA2 (AES). Also put your phone on the same network during setup if the app requires it.
My phone cannot control my smart TV or speaker. They are probably on different networks. Place them on the same network, or configure mDNS or multicast forwarding if your router supports it.
The guest network is slow. Check bandwidth limits, router placement and band selection. Consider limiting the number of guests and using 5 GHz where possible.
I forgot my router password. Look for a sticker on the router, check any saved credentials or reset the router to factory defaults as a last resort. Resetting erases your settings, including Wi-Fi names and passwords, so you will need to set everything up again.
I have double NAT or two routers. Put the provider’s gateway into bridge mode, or create the guest network on the device that actually handles your routing. See the section above.
Guest Network Setup Checklist
- Update router firmware
- Change the default admin password
- Create the guest network with a clear name
- Select WPA3 or WPA2 (AES) security
- Create a strong, unique guest password
- Turn off access to the local network
- Turn on client or AP isolation
- Set optional speed, time or schedule limits
- Choose appropriate Wi-Fi bands
- Test the guest connection for internet access
- Test that guests cannot reach your router admin page or other devices
- Move smart devices to the guest or IoT network if appropriate
- Share the password safely, ideally with a QR code
- Plan to change the password regularly
- Document your settings
Frequently Asked Questions About Guest Wi-Fi Network Setup
How do I set up a guest Wi-Fi network?
Log in to your router’s admin page or app, find the Guest Network section, enable it, choose a name and a strong password, select WPA3 or WPA2 security, turn on client isolation and turn off access to your local network. Save the settings and then test with a phone to confirm that it has internet access but cannot reach your other devices.
Is a guest network really more secure?
Yes, when it is properly isolated. A guest network keeps visitors’ devices away from your computers, storage and cameras, and it lets you avoid sharing your main password. It is only as good as your router’s implementation, so test isolation and keep the firmware updated.
Should I put my smart home devices on the guest network?
It is a good idea for many gadgets, especially cloud-based ones, because it limits the damage if one is compromised. However, devices that need to communicate locally with your phone or hub, such as casting devices, printers or some Matter and Thread products, may not work when isolated. Test each device, and consider a dedicated IoT network if your router supports it.
Does a guest network slow down my main network?
Not by much unless many guests use a lot of bandwidth. The guest network shares your internet connection, so heavy downloads or streaming can affect everyone. You can limit guest speeds, set time limits or restrict the number of devices to keep your main network fast.
Can guests on my guest network see my other devices?
They should not if isolation is enabled. Make sure the option to allow guests to access your local network is off, and that client or AP isolation is on. Always test by connecting a phone to the guest network and attempting to reach your router and another device on the main network.
Conclusion: Make Guest Wi-Fi Network Setup Part of Your Home Security Routine
A guest network costs nothing, takes minutes and meaningfully reduces your risk. Log in to your router, enable the guest network, choose a strong password, turn on isolation and test it. Then decide whether to move your smart gadgets onto a separate IoT network. Revisit your settings after firmware updates, change the guest password now and then, and replace any router that no longer gets security updates. With a clean guest Wi-Fi network setup in place, you can welcome visitors, add new smart devices and still keep your most important devices safely behind the wall.