Before you throw out, sell or recycle a computer, you need to destroy old hard drive data first, because the drive almost certainly still holds personal files, saved passwords, tax records, photos and more. Dragging files to the trash, emptying the recycle bin or even formatting the disk does not reliably remove them. This guide explains the right way to securely erase a hard drive, how to dispose of an SSD safely (it is different from a spinning disk), what to do with USB sticks and phones, and when physical destruction makes sense. The steps are written for home users and small businesses, with notes on standards and compliance.
Quick Answer: What Is the Best Way to Destroy Old Hard Drive Data?
The best method depends on the type of drive, how sensitive the data is, and whether you want to reuse the drive.
| Situation | Best Approach |
| Spinning hard drive (HDD) you want to reuse, sell or donate | Full-disk erase (a single overwrite pass or the drive’s built-in secure erase), then verify |
| SSD or NVMe drive you want to reuse, sell or donate | Manufacturer’s secure erase or sanitize tool, or cryptographic erase (encryption key destruction). Do not rely on repeated overwriting |
| Any drive with highly sensitive data (business, legal, medical, financial) | Erase, then physically destroy, or use a certified destruction service |
| Dead drive that will not power on, so it cannot be erased | Physical destruction |
| USB flash drive or SD card with sensitive data | Physical destruction is the most reliable option |
| Phone or tablet | Make sure it is encrypted, remove accounts, then factory reset |
| Not sure, or cannot verify the erase | Physically destroy the drive and recycle it responsibly |
The short rule: erase first when you can, destroy physically when you must or when the stakes are high, and always recycle responsibly afterward.
Why Deleting Files Is Not Enough
When you delete a file, the operating system usually removes the pointer that tells it where the file lives and marks the space as available. The actual data often stays on the drive until something else overwrites it. Free recovery tools can often bring such files back.
Common methods that do not securely erase a drive:
- Moving files to the recycle bin or trash and emptying it
- Deleting folders and partitions
- Quick formatting, which rebuilds the file system but may leave most data intact
- Reinstalling the operating system without a full wipe
- Uninstalling programs
- A simple “factory reset” on some older devices that are not encrypted
If the drive holds anything you would not want a stranger to read, treat disposal as a security task, not housekeeping.
What Could Be Recovered From a Discarded Drive?
- Documents, photos, videos and email archives
- Saved browser passwords, cookies and logged-in sessions
- Tax returns, bank statements, scans of IDs and passports
- Medical, legal or business records
- Cryptocurrency wallet files and password manager vaults
- Work files, client data and company secrets
- Chat histories and backups of phones
Identity thieves, stalkers and snoopers do buy used drives and run recovery software, and studies have repeatedly found personal data on second-hand drives. Wiping properly takes less time than dealing with a breach.
Understanding the Terms: Clear, Purge and Destroy
The U.S. National Institute of Standards and Technology (NIST) publishes the most widely used guidance on media sanitization. It describes three methods: Clear, which overwrites user-accessible storage to protect against casual retrieval; Purge, which uses stronger techniques such as cryptographic erase or block erasure to resist laboratory-level recovery; and Destroy, which physically renders the media unusable through methods such as shredding or incineration.
NIST SP 800-88 Rev. 2 was published in September 2025 and replaces the 2014 revision. Commentary on the revision notes that it advises against running many overwrite passes on hard drives, and cautions that Clear may leave some data exposed on modern magnetic and flash storage. The revision also shifts the emphasis toward running an organization-wide media sanitization program with validation, and it no longer lists device-by-device technique appendices, instead pointing to current industry standards.
In plain language:
- Clear: fine for low-risk situations where you are keeping the drive or giving it to someone you trust.
- Purge: the sensible target when a drive leaves your control but you still want to reuse it. This includes cryptographic erase and built-in secure erase or sanitize commands.
- Destroy: the answer for drives you cannot erase, drives holding highly sensitive data, or when you want zero risk.
HDD vs SSD: Why the Drive Type Changes Everything
Before you pick a method, you need to know what you have.
Hard Disk Drives (HDDs)
HDDs store data magnetically on spinning platters. Overwriting every sector once is generally considered sufficient on modern drives. The old advice to overwrite 7, 35 or more times comes from a time when much older drive technology was in use, and it is not necessary today. Physical destruction works well because the platters can be damaged directly.
Solid State Drives (SSDs), NVMe Drives and Flash Storage
SSDs store data in flash memory chips and use a controller that manages where data lands. Because of wear leveling, spare areas (over-provisioning) and remapped blocks, an overwrite tool that works on a hard drive cannot be sure it has touched every location where your data sits. That is why standard “overwrite the drive multiple times” tools are the wrong approach for SSDs and can wear the drive without erasing everything.
For SSDs, the reliable options are:
- The drive’s built-in secure erase or sanitize command (ATA Secure Erase, NVMe Format with secure erase, or NVMe Sanitize)
- The manufacturer’s utility, which uses those commands
- Cryptographic erase on self-encrypting or software-encrypted drives, which destroys the encryption key so the data becomes unreadable
- Physical destruction of the memory chips
USB Flash Drives and SD Cards
These use flash memory too but usually lack reliable secure erase commands. Overwriting may miss hidden or remapped areas. For sensitive data, physically destroying the memory chip is the safest choice. For low-risk drives, a full format followed by filling the drive with dummy data is better than nothing but not guaranteed.
Phones and Tablets
Modern phones encrypt storage by default. A factory reset removes the encryption keys, which effectively makes the data unreadable (cryptographic erase). Before reset, confirm encryption is on and remove accounts and locks, as described below.
Hybrid Drives (SSHD) and Other Media
Hybrid drives combine a spinning disk with a flash cache and should be treated as sensitive, using secure erase plus physical destruction when in doubt. Optical discs (CDs, DVDs), tapes and memory cards each have their own destruction methods; shredders designed for discs are common for CDs and DVDs.
Before You Destroy an Old Hard Drive: Preparation Checklist
- Back up what you need. Copy everything you want to keep to another drive or a trusted cloud service, and test that the backup opens. Once you erase, there is no undo.
- Find hidden copies. Check for cloud sync folders, external drives, old partitions and attached storage that also hold your data.
- Sign out and deauthorize. Sign out of cloud services, deauthorize software licenses (for example, creative apps and music libraries), remove the device from your account lists, and turn off any “find my device” lock features. Skipping this can leave a device locked to your account.
- Export passwords and keys. Make sure your password manager, authenticator apps, cryptocurrency wallets and two-factor codes are backed up elsewhere before you wipe anything.
- Identify your drive type. Check Device Manager (Windows), System Information (macOS) or the drive label to find out if it is an HDD, SATA SSD, NVMe SSD or something else.
- Check whether the drive is encrypted. If BitLocker, FileVault, LUKS or hardware encryption is active, cryptographic erase may be your quickest, strongest option.
- Decide: reuse, sell, donate or destroy. Use the table below.
- Note the make, model and serial number if you need records, for example for a business.
Reuse, Sell, Donate or Destroy? A Quick Risk Guide
| Data on the drive | Recommended Option |
| Mostly non-sensitive (games, media, public documents) | Erase, then reuse, sell or donate |
| Personal files, email, photos, saved logins | Purge-level erase (secure erase or cryptographic erase) and verify, then reuse or recycle. Destroy if you are not comfortable |
| Financial, medical, legal or client data | Erase and destroy, or use a certified destruction provider |
| Business data subject to regulation | Follow your organization’s policy, document the process and get a certificate of destruction |
| Drive is failing or unreadable | Physically destroy, since you cannot confirm an erase |
How to Securely Erase a Hard Drive: Step-by-Step
Follow these steps in order. Read each one fully before you begin, and double-check the drive you are about to erase. The wrong target means lost data.
Step 1: Back Up and Verify
Copy what matters, open a few files from the backup to confirm they work, and keep the backup in a second location. This is your last chance.
Step 2: Sign Out, Deauthorize and Remove Accounts
Remove the device from your Microsoft, Apple, Google and other accounts, sign out of cloud storage and deauthorize licensed software. Disable activation locks and remote tracking. Doing this first prevents a buyer from being blocked and protects your accounts.
Step 3: Identify the Drive Type and Choose Your Tool
Use this guide:
- HDD, internal or external: operating system reset with full wipe, a reputable disk-wiping tool, or the drive’s secure erase.
- SSD or NVMe: manufacturer utility, built-in secure erase or sanitize, or cryptographic erase.
- Encrypted system drive: reset the device after confirming encryption, or destroy the key, then wipe.
- USB stick or SD card: physical destruction for sensitive data.
Step 4: Erase an HDD
Pick one of these approaches.
Option A: Use the operating system’s reset with a full wipe.
- Windows: open Settings, then System, then Recovery, then Reset this PC. Choose to remove everything, then choose the option to clean the drive (names vary by version) instead of just removing files. This is a good option when you are passing on the whole computer.
- macOS: on recent Macs with Apple silicon or the T2 security chip, use Erase All Content and Settings in System Settings, which destroys the encryption keys. On older Macs, use Disk Utility from recovery mode to erase the drive, then reinstall macOS if you are handing the Mac on.
- ChromeOS: use Powerwash, which resets the device and removes user data.
Option B: Use a dedicated wiping tool.
Use a reputable tool to overwrite the whole disk with a single pass of zeros or random data. Boot from a USB stick so the operating system on the drive is not running, select the entire drive (not just a partition), and let it finish. A single pass is considered enough for modern hard drives. Multiple passes only add time. Large drives can take many hours.
Option C: Use the drive’s built-in secure erase.
Many drives support an ATA Secure Erase command, which is usually run from a bootable utility or a Linux live environment. It can be fast and thorough, but it requires care: the drive must not be in a “frozen” state, and the wrong command or target can wipe the wrong disk. If you are not comfortable at the command line, use the manufacturer’s utility or a wiping tool with a graphical interface.
Whichever method you choose, make sure the tool is not set to wipe only free space or quick format.
Step 5: Securely Erase an SSD or NVMe Drive
For SSDs, you want an approach that talks to the drive’s controller.
Option A: Use the manufacturer’s utility.
Major SSD makers provide tools (for example, utilities from Samsung, Crucial, Western Digital, Kingston, Intel/Solidigm and others) that include Secure Erase or Sanitize functions. Download the tool from the manufacturer’s official website only, confirm your model is supported and follow their instructions. Some require the drive to be a secondary drive or to boot from a USB stick.
Option B: Use ATA Secure Erase, NVMe Format or NVMe Sanitize.
These are standard commands built into the drive. Depending on the drive, they either erase all blocks or destroy the internal encryption key, which is much faster. They are typically run from bootable tools or a Linux live environment. Be careful to target the correct device, and confirm the drive reports success. If you are not experienced with these commands, use a graphical tool or the manufacturer’s utility.
Option C: Cryptographic erase.
If the drive is a self-encrypting drive, or you have been using full-disk encryption such as BitLocker or FileVault from the start, destroying or changing the encryption key renders the stored data unreadable. On many modern computers, resetting the device with the operating system’s reset function performs this step. For the strongest result, combine it with a secure erase or sanitize command if the drive supports it.
Option D: Encrypt, then erase (when you have no better option).
If your SSD was not encrypted, one extra safeguard is to turn on full-disk encryption, let it complete, and then delete the keys and reset the drive. Because everything on the disk was written in encrypted form, remnants in spare areas are protected. This is not as strong as a proper sanitize command, but it improves the situation when nothing better is available.
What not to do on an SSD:
- Do not run a multi-pass overwrite tool. It wears the drive and may leave data in areas the tool cannot reach.
- Do not assume a quick format is enough.
- Do not trust a “wipe free space” feature as a full erase.
Step 6: Handle USB Drives and Memory Cards
For anything sensitive, plan to physically destroy the chip. For low-risk drives you plan to reuse, do a full format and fill the empty space with random data, accepting that this is not a guaranteed purge. Encrypted USB drives that use hardware encryption can be wiped by resetting the device or destroying the key, following the manufacturer’s instructions.
Step 7: Reset Phones and Tablets Properly
- Back up your data.
- Sign out of your Apple ID or Google account and turn off activation lock or factory reset protection.
- Make sure device encryption is on. Modern iPhones and most recent Android phones encrypt automatically, but check settings on older devices and enable encryption before resetting.
- Remove the SIM card and any microSD cards. Wipe or destroy the memory card separately.
- Use the factory reset option (Erase All Content and Settings on iPhone, Factory Data Reset on Android).
- Confirm that the device returns to the setup screen with no account attached.
Step 8: Verify the Erase
Verification matters, because a failed or partial erase is easy to miss.
- Check the tool’s report for success, and keep a screenshot or log.
- Try to boot the machine or mount the drive. It should show no operating system, no partitions or an empty disk.
- Run a file recovery program on the drive and see whether it finds recognizable files. Finding none is reassuring, though not proof of a laboratory-grade purge.
- For business use, follow your organization’s validation procedure and record the result.
- If anything fails or you are unsure, repeat the erase or move on to physical destruction.
How to Physically Destroy an Old Hard Drive
When erasing is impossible, unreliable or not trusted, physical destruction is the answer. Its advantage is certainty: if the storage medium is gone, so is the data.
When to Choose Physical Destruction
- The drive is dead, corrupted or will not respond to erase commands
- You cannot verify that an erase worked
- The data is highly sensitive or regulated
- You are disposing of USB sticks, SD cards or other flash media with sensitive data
- Company policy or legal requirements call for destruction
- You simply do not need the drive anymore and want certainty
Safety First
Destroying drives can cause injuries. Take these precautions:
- Wear safety glasses, work gloves and a dust mask if you are drilling or breaking components.
- Work outdoors or in a well-ventilated area, on a sturdy surface, away from children and pets.
- Be careful of sharp edges and flying fragments.
- Never burn drives, microwave them or soak them in acid or other chemicals. These methods can release toxic fumes, cause fires or explosions and are often illegal.
- Treat lithium batteries (in laptops, phones and some devices) with care. Remove them first and take them to a battery recycling point. Damaging a lithium battery can start a fire.
- Be careful with the powerful magnets inside hard drives, which can pinch fingers hard.
- Check local rules for disposing of broken electronics and any hazardous parts.
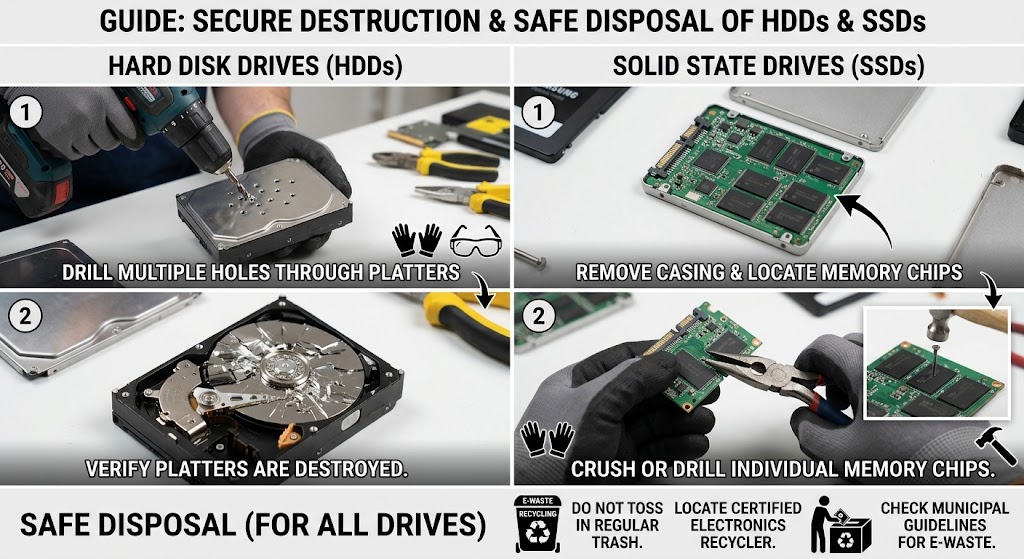
How to Destroy a Hard Drive (HDD)
- Disconnect the drive from the computer and power.
- Remove the drive from its housing. Use the right screwdrivers. Many hard drives use Torx screws.
- Open the casing to expose the platters (the shiny disks), if you can do so safely. Some drives are sealed and require force.
- Remove or damage the platters. Scratch, bend or break them, or drill through them in multiple places. The aim is to destroy the surface where data is stored, not just the outer shell. Glass platters shatter, so wear eye protection.
- Damage the circuit board too, though the platters are what store the data.
- Dispose of the pieces through an electronics recycler, not in the household trash.
Hammers and drills do work on platters, but a few holes in the case alone may not be enough. Aim at the platters themselves.
How to Destroy an SSD, USB Stick or SD Card
Flash memory is stored in small chips, so you need to destroy those chips.
- Open the SSD’s case and locate the flash memory chips, which are the larger black rectangles on the circuit board. M.2 NVMe drives are small, with chips visible on the board.
- Break or crush the memory chips. Cutting, drilling or smashing the board through the chips can work, but the aim is to destroy the memory chips themselves, not just the connector or the controller.
- For USB sticks and SD cards, break the memory chip or crush the whole device thoroughly.
- Do this with eye protection, since fragments can fly.
- Dispose of the pieces through electronics recycling.
Because chips are small and tough, professional shredders designed for SSDs break them into very small pieces, which is why certified services use industrial shredders.
What About Degaussing?
Degaussing uses a strong magnetic field to scramble data on magnetic media such as HDDs and tape. It does not work on SSDs or flash memory, and consumer magnets are not strong enough. Degaussers used by organizations are specialized and expensive, and recent guidance has been revisiting how it fits into modern programs. For home users, a household or fridge magnet will not erase a hard drive, so do not rely on one.
Professional Destruction Services
For many people and almost all businesses, a certified destruction service is the simplest, most defensible choice.
What to look for:
- Certification or alignment with recognized standards for data destruction and electronics recycling
- On-site destruction (a truck shreds your drives in front of you) or documented off-site destruction with secure transport
- Chain-of-custody tracking with serial numbers
- A certificate of destruction for each batch
- Insurance and clear terms
- Responsible recycling of the shredded material
Costs vary, from a small per-drive fee for drop-off programs to higher prices for on-site shredding. Many office supply and electronics retailers also run drop-off or mail-in programs, but check what they do with the drives and whether they provide documentation.
Comparison of Hard Drive Destruction and Erasure Methods
| Method | Works On | Security Level | Cost | Drive Reusable? | Notes |
| Delete or quick format | Everything | Very low | Free | Yes | Data easily recovered, not acceptable |
| Single-pass overwrite (full disk) | HDDs | Good for most users | Free to low | Yes | Verify afterward; not reliable for SSDs |
| Multi-pass overwrite (3, 7, 35 passes) | HDDs | No better than one pass on modern drives | Free to low | Yes | Wastes time; not recommended |
| OS reset with full wipe | HDDs and SSDs, depending on device | Good for personal use when encrypted or fully wiped | Free | Yes | Check that it performs a real wipe or key destruction |
| ATA Secure Erase / NVMe Sanitize | HDDs and SSDs | High (purge level) | Free | Yes | Needs correct tools and care |
| Cryptographic erase | Encrypted drives and self-encrypting drives | High if implemented properly | Free | Yes | Key must be truly destroyed |
| Degaussing | HDDs and tapes | High on magnetic media when done with proper equipment | Costly | No (drive is rendered unusable) | Does nothing for SSDs and flash |
| DIY physical destruction | HDDs, SSDs, USB, SD | High if platters or chips are destroyed | Low | No | Safety risks; must destroy the storage medium itself |
| Professional shredding | All media | Very high | Moderate | No | Get a certificate and chain of custody |
Responsible Disposal: What to Do With the Drive Afterward
Once the data is gone or the drive is destroyed, you still need to dispose of the physical item properly.
- Do not put electronics in the household trash. Drives contain metals and components that should be recycled, and in many places throwing them out is illegal.
- Use certified e-waste recyclers. Look for recyclers certified under recognized responsible-recycling programs, and ask what happens to the material.
- Check manufacturer, retailer and municipal take-back programs. Many offer free or low-cost drop-offs.
- Donate only erased drives. Charities and refurbishers may reuse drives, but only hand over drives that have been purged. If you are not certain, destroy the drive.
- Recycle shredded or broken pieces the same way. Parts may be recovered as scrap metal.
- Keep proof for businesses. Retain receipts, certificates and serial-number logs.
Don’t Forget Other Devices That Store Data
Hard drives hide in more places than laptops and desktops. Before you dispose of or hand off any of these, wipe or destroy the storage:
- Printers, copiers and multifunction devices, which often keep scanned documents on internal drives
- Network storage (NAS) and external backup drives
- Home routers and smart home hubs, which may store Wi-Fi passwords and settings
- Game consoles and streaming devices with signed-in accounts
- Smart TVs, set-top boxes and DVRs
- Security cameras and video recorders
- Digital cameras, drones and action cameras (memory cards)
- E-readers, tablets and old phones
- Car infotainment systems that sync contacts and navigation history
- Old laptops in drawers and attics
- Work computers and loaned equipment (follow your employer’s policy; do not wipe company equipment on your own)
Always check the manufacturer’s instructions for a factory reset, and remove removable media.
Business and Compliance Considerations
If you handle other people’s data, disposal is a legal and contractual matter, not just a good habit.
- Data protection laws such as GDPR and state privacy laws expect appropriate technical measures to protect personal data throughout its lifecycle, including disposal.
- Health data rules such as HIPAA in the United States require safeguards for protected health information on electronic media, including proper disposal.
- Payment card standards require secure destruction of media holding cardholder data.
- Financial, legal and government contracts often specify destruction methods and documentation.
- NIST SP 800-88 Rev. 2 is widely used as a reference for media sanitization programs, and many policies and contracts cite it.
Practical steps for organizations:
- Write a media sanitization policy that classifies data and sets the required method (clear, purge or destroy) for each class.
- Track assets from purchase to disposal, including serial numbers.
- Assign responsibility and train staff.
- Use validated tools and keep logs of each erase.
- Prefer destruction for drives that leave your control with sensitive data.
- Require certificates of destruction and keep them for the retention period your rules require.
- Handle cloud and virtual storage too: deleting a virtual machine or storage bucket is a data sanitization question, and encryption key management is the main tool. Revision 2 of the NIST guidance explicitly extends its thinking to logical storage in cloud environments.
- Review your process regularly and test it.
Common Mistakes When You Destroy an Old Hard Drive
- Believing that deleting or formatting is enough.
- Using a multi-pass hard drive wiper on an SSD.
- Wiping the wrong drive. Always double-check the target, and disconnect other drives when possible.
- Skipping verification and assuming the tool worked.
- Forgetting to back up important files first.
- Forgetting to sign out of accounts and deauthorize software.
- Relying on a magnet to erase a drive.
- Destroying only the casing or the connector and leaving the platters or chips intact.
- Burning, microwaving or using chemicals, which is dangerous and often illegal.
- Handing a drive to an unvetted “recycler” without any documentation.
- Forgetting drives in printers, NAS devices and old phones.
- Leaving encryption keys or recovery keys stored online after you have disposed of the drive. Delete old recovery keys if you no longer need them.
Destroy Old Hard Drive Checklist
- I backed up all needed data and tested the backup
- I signed out of accounts and deauthorized software
- I identified whether the drive is an HDD, SSD, NVMe, USB or SD card
- I chose the right method for the drive type and data sensitivity
- I erased the drive with a full wipe, secure erase, sanitize or cryptographic erase
- I verified the result
- For sensitive data or failed erases, I physically destroyed the platters or memory chips (or used a certified service)
- I wore eye protection and followed safety rules
- I took the remains to a certified e-waste recycler
- I kept a record or certificate if the data was business-related
- I checked other devices that store data
Frequently Asked Questions About Destroying Old Hard Drives
How do I destroy an old hard drive safely?
First back up what you need. If the drive works, securely erase it with a full-disk wipe or the drive’s secure erase function, then verify. If the drive is dead, holds highly sensitive data or you want certainty, physically destroy the platters (for a hard drive) or the memory chips (for an SSD or USB stick) while wearing eye protection, then recycle the pieces through a certified e-waste recycler.
Is formatting a hard drive enough to erase it?
No. A quick format usually rebuilds the file system but leaves most of the data in place, and recovery tools can often retrieve it. Use a full-disk wipe, the drive’s secure erase or cryptographic erase, and verify the result. For maximum certainty, destroy the drive.
How do I dispose of an SSD safely?
Use the SSD manufacturer’s secure erase or sanitize tool, a built-in ATA Secure Erase or NVMe Sanitize command, or cryptographic erase if the drive is encrypted. Do not rely on repeated overwriting, which can miss areas of flash memory. If the data is sensitive or the drive cannot be erased, destroy the memory chips or use a certified shredding service.
Does smashing a hard drive with a hammer work?
It can, if you damage the platters themselves. Hitting only the outer case may leave the platters intact. Open the drive, destroy the platters by breaking, bending or drilling them in multiple places, and wear eye protection. For SSDs, you must destroy the memory chips, not just the casing.
Can a magnet erase a hard drive?
Household magnets are not strong enough, and magnets have no effect on SSDs or flash drives. Degaussing equipment used by professionals can erase magnetic media but is specialized and expensive. For home use, rely on a software erase or physical destruction instead.
Conclusion
Throwing away a hard drive without a proper erase is like throwing away a filing cabinet full of your private papers. The fix is simple: identify the drive type, choose the right method, verify the result, and when in doubt, destroy old hard drive hardware completely and recycle it responsibly. Use a full wipe or cryptographic erase for HDDs, a manufacturer secure erase for SSDs, physical destruction for USB sticks and sensitive data, and certified services when documentation matters. A little effort now protects you from identity theft, privacy breaches and compliance headaches later.