Losing a laptop is stressful enough without also wondering who’s going to end up looking through your tax returns, saved passwords, or old photos. Encryption is the thing that turns “someone stole my laptop” from a privacy disaster into a mild inconvenience, because even if they pull the drive out and plug it into another machine, all they’ll find is scrambled nonsense without your password or recovery key.
This isn’t a hypothetical worry in 2026. With so much work happening from cafes, trains, and home offices instead of a locked office building, stolen and lost devices have become one of the more lucrative targets for opportunistic theft and targeted attackers alike. A recent industry survey of senior IT decision-makers found that 76% of organizations reported being affected by device theft incidents, and the fallout from a single stolen laptop can go well beyond the cost of replacing the hardware, especially if the drive wasn’t properly protected.
The good part is that both Windows and macOS have solid encryption built in for free, and you don’t need to be technical to turn it on. The slightly less good part is that there’s more than one layer of encryption worth understanding, and a couple of default settings worth double-checking, because the “encryption is already on” assumption trips up more people than you’d expect. Full-disk encryption protects everything if your laptop is lost or stolen, while file-level encryption protects specific documents even if you’re logged in and someone else gets on your machine, or if you need to send a file somewhere that isn’t fully secure. This guide covers both, on both operating systems, plus a few cross-platform tools worth knowing about if you move files between a Mac and a PC regularly.
Why Bother Encrypting at All
It’s worth being specific about what encryption actually protects against, because the threat model matters for which method you pick.
If your laptop gets physically stolen left in a cafe, taken from a car, lost at an airport the thief doesn’t need your Windows or Mac login password to get at your files. They can simply remove the hard drive or SSD, plug it into a different computer as an external drive, and read everything on it directly, completely bypassing your login screen. This is the scenario full-disk encryption exists for. Without it, your account password is basically a polite request that a determined person can walk straight around.
Then there’s a narrower scenario: someone else uses your laptop while you’re logged in, or has physical access to it unlocked, and you want certain files financial records, client contracts, anything sensitive protected even from someone who’s already past your login screen. That’s what file-level and folder-level encryption is for, and it’s a separate, additional layer on top of full-disk encryption, not a replacement for it.
And finally, there’s sharing: sending a sensitive file over email, uploading it to a shared drive, or handing someone a USB stick. Full-disk encryption doesn’t help you here at all, since the moment the file leaves your laptop, it’s traveling unprotected unless you’ve encrypted that specific file or the archive it’s sitting in.
With that framing in mind, here’s how to set each of these up, plus one 2026-specific catch in the default Windows setup that’s worth knowing about before you assume you’re covered.
Windows: Full-Disk Encryption with BitLocker and Device Encryption
Windows has two related but distinct full-disk encryption features, and which one you get depends on your edition of Windows and your hardware.
Device Encryption is the simplified, consumer-facing version. It’s available on Windows 10 and 11 Home editions, as long as your hardware meets certain requirements mainly a TPM (Trusted Platform Module) chip, which is a small security chip built into essentially every modern laptop that stores encryption keys separately from the drive itself. If your laptop supports it, Device Encryption is often turned on automatically when you sign in with a Microsoft account, and the recovery key gets backed up to your Microsoft account automatically.
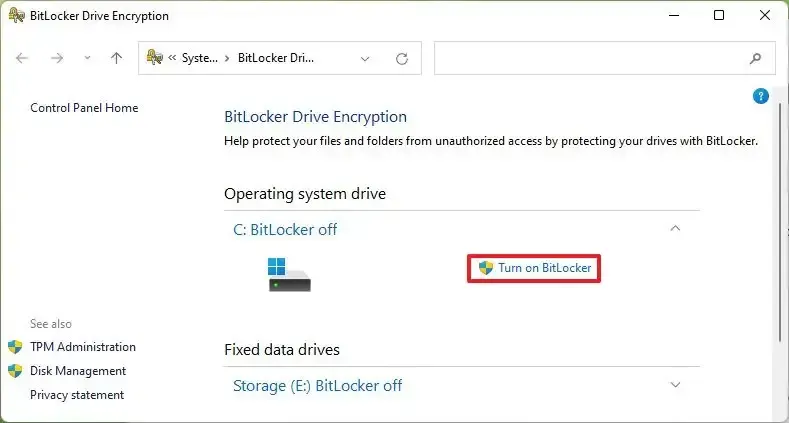
BitLocker is the full-featured version, available on Windows Pro, Enterprise, and Education editions. It gives you more control you can choose your unlock method, decide exactly where your recovery key gets stored, encrypt secondary drives and USB sticks, and set more granular policies if you’re managing multiple machines.
Here’s how to check which one you have and turn it on.
Checking for Device Encryption (Windows Home):
- Open Settings, then go to Privacy & Security.
- Look for Device Encryption near the bottom of that page.
- If you see it listed and it’s off, toggle it on. If you don’t see the option at all, your hardware likely doesn’t have the TPM or Secure Boot support Device Encryption requires, and you’ll want to look at a third-party tool instead (more on that below).
Turning on BitLocker (Windows Pro, Enterprise, and Education):
- Open File Explorer, and click This PC in the sidebar.
- Right-click your main drive (usually C:) and select Turn on BitLocker.
- Choose how you want to unlock the drive at startup. This step matters more than it looks, so read the callout box below before picking the default option.
- Back up your recovery key. This step is not optional, and it’s the single most important part of the whole process. Windows will offer to save it to your Microsoft account, save it as a file, save it to a USB drive, or print it. If you ever forget your PIN or your TPM configuration changes (which can happen after certain firmware or motherboard updates), this recovery key is the only way back into your data. Saving it only to your Microsoft account is convenient, but also save a copy somewhere physically separate from the laptop a password manager’s secure notes feature, or a printed copy in a safe, both work well. Don’t save it as a file on the same drive you’re encrypting; if that drive ever fails or gets stolen, your recovery key goes with it.
- Choose whether to encrypt used disk space only or the entire drive. If you’re encrypting a laptop that already has months or years of files on it, encrypt the entire drive it takes longer but ensures that deleted files or fragments left in unused space are also protected.
- Pick the encryption mode. Windows will typically default to “New encryption mode” (XTS-AES) for internal fixed drives, which is the right choice unless you’re planning to move the drive to an older system that doesn’t support it.
- Click Start Encrypting, or Continue and then restart if prompted. Encryption runs in the background, so you can keep using your laptop while it works, though it’ll be a bit slower until the process finishes.
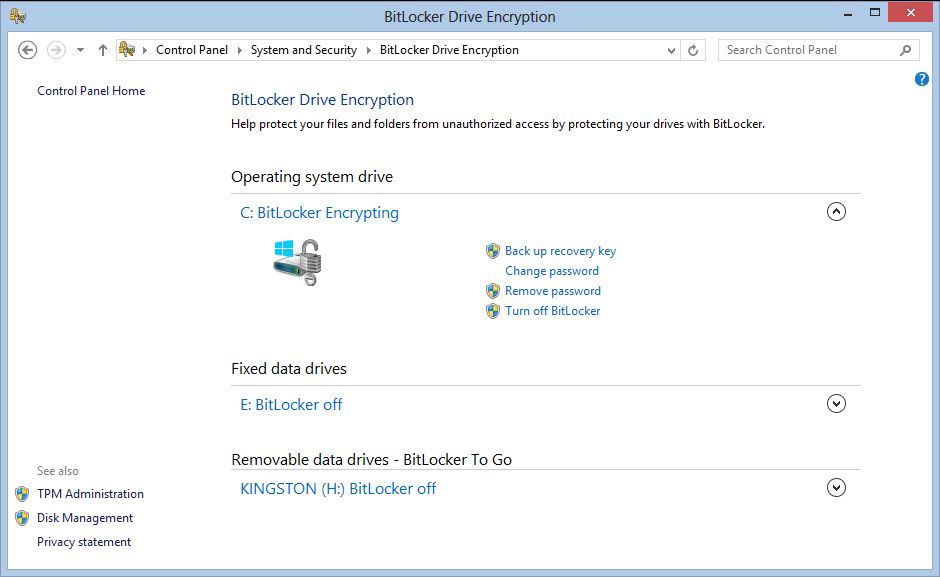
Why the “TPM-only” default deserves a second look in 2026. Older advice (including plenty of guides still floating around) treats “let it unlock automatically via the TPM chip” as the best balance of convenience and security. That’s worth revisiting. Security researchers, including HP’s VP and Security & Commercial Systems CTO, have described how a laptop’s default BitLocker configuration releases its decryption key to the TPM during startup once the boot environment checks out, and that this handoff can be physically intercepted with cheap, widely available hardware in some demonstrated cases, in under a minute. That doesn’t mean BitLocker is broken or not worth using; it means TPM-only mode alone isn’t the strongest configuration for a laptop that leaves the house. Adding a PIN that you type in at every startup closes this specific gap, because the drive can no longer unlock itself the moment it boots it also needs something only you know. Given how little friction this adds to your morning routine, it’s worth choosing TPM + PIN over TPM-only when you set BitLocker up, particularly on a laptop you travel with.
One more physical-security detail worth knowing: a Kensington-commissioned study found that organizations using physical security locks on their laptops were 37% less likely to experience a data breach tied to an unsecured device a reminder that encryption and old-fashioned physical deterrents work best together, not as substitutes for each other.
A final note: BitLocker requires being signed in as an administrator to turn on, and if your organization manages your laptop through work IT policies, BitLocker might already be enabled and controlled centrally check with your IT department before trying to change settings on a work machine.
Windows: Encrypting Individual Files and Folders
Full-disk encryption is your baseline, but sometimes you want an extra layer on specific files especially ones you might share or copy elsewhere.
Option 1: Windows’ built-in EFS (Encrypting File System). This is a lesser-known feature tied to your Windows user account, and it’s separate from BitLocker.
- Right-click the file or folder you want to encrypt and choose Properties.
- On the General tab, click Advanced.
- Check the box for Encrypt contents to secure data, then click OK and Apply.
- Windows will ask if you want to apply this to the folder only or to the folder plus all its subfolders and files usually you’ll want the latter if you’re encrypting a whole folder.
EFS encrypts the file so that only your specific Windows user account can open it, even if someone else logs into a different account on the same machine. The catch is that it’s tied to your Windows login profile and its associated certificate, so if you reinstall Windows, move to a new PC, or your user profile gets corrupted without a backed-up certificate, those files can become permanently unreadable including to you. If you use EFS, back up your encryption certificate (Windows will prompt you to do this the first time you encrypt a file) and store that backup somewhere separate from the PC itself.
Option 2: Password-protected ZIP archives with 7-Zip. This is a more portable option, since it doesn’t tie the file to your specific Windows account or machine, and it works well for files you plan to email or upload somewhere.
- Download and install 7-Zip, a free, well-established archive tool.
- Right-click the file or folder you want to protect, hover over 7-Zip, and select Add to archive.
- In the dialog that opens, set the archive format to 7z (it has stronger built-in encryption than the standard ZIP format), enter and confirm a password, and make sure AES-256 is selected as the encryption method.
- Click OK. The resulting archive can only be opened with the password you set, on any computer with 7-Zip installed, regardless of whether it’s the same machine or account.
This method is genuinely useful for sending sensitive files to someone else just make sure you share the password through a different channel than the file itself, like a text message or a phone call, rather than in the same email.
Mac: Full-Disk Encryption with File Vault
Apple’s version of full-disk encryption is called File Vault, and it’s built into every version of mac OS. It uses XTS-AES-128 encryption and, with the entire current Mac lineup now running on Apple Silicon, it’s faster and simpler to set up than it’s ever been.
- Click the Apple menu in the top-left corner and choose System Settings.
- In the sidebar, click Privacy & Security, then scroll down until you find the File Vault section.
- Click Turn On. You’ll be asked to enter your administrator password to confirm.
- Choose your recovery method:
- Allow my iCloud account to unlock my disk convenient, since if you forget your Mac password, you can reset it using your Apple ID credentials. This is the right choice for most personal, non-business use, as long as your Apple ID itself is well secured with a strong password and two-factor authentication.
- Create a recovery key and do not use my iCloud account this generates a long alphanumeric code that’s the only way back into your data if you forget your password. It doesn’t depend on iCloud at all, which is preferable for business laptops or anyone who doesn’t want their Mac’s recovery tied to their Apple account. If you choose this option, write the key down immediately and store it somewhere secure and separate from the laptop.
- Click Continue, and if prompted, restart your Mac to begin the encryption process.
- Encryption then runs in the background. You can keep using your Mac normally while it works. On Apple Silicon Macs, a typical drive finishes encrypting in a couple of hours.
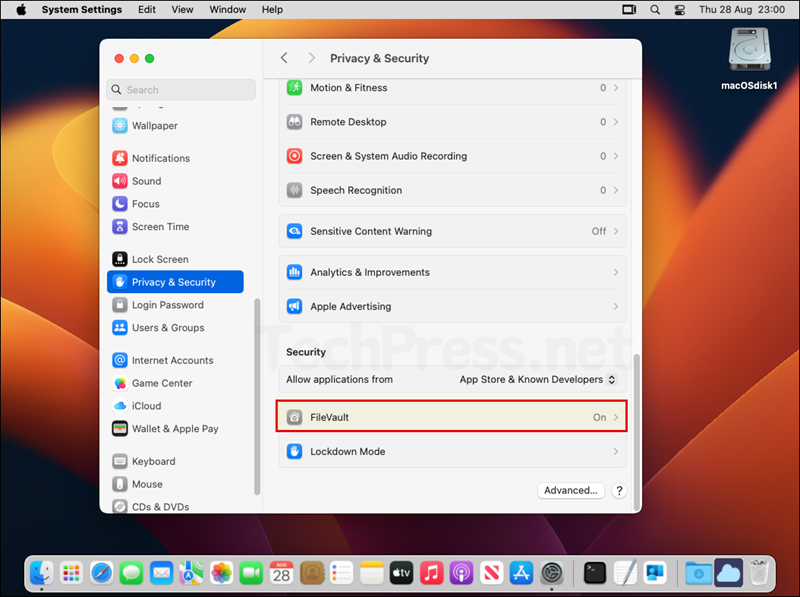
One detail that trips people up: File Vault’s protection depends entirely on your login password actually being required and reasonably strong. If your Mac is set to auto-login without a password, File Vault is still technically encrypting your drive, but anyone who simply opens the laptop can access everything without ever needing to know that password, which defeats a large part of the purpose. Go to System Settings → Users & Groups → Login Options and make sure automatic login is turned off, and use a proper password rather than something trivial.
Mac: Encrypting Individual Files and Folders
Mac OS doesn’t have a direct equivalent to Windows’ EFS baked into every folder’s right-click menu, but there are two solid built-in-ish options plus a couple of great third-party tools.
Option 1: Encrypted disk images with Disk Utility. This is Apple’s native way of creating a password-protected, encrypted “vault” that behaves like a regular folder once it’s unlocked.
- Open Disk Utility (found in Applications → Utilities, or just search for it with Spotlight).
- Go to File → New Image → Image from Folder, and select the folder you want to encrypt. Alternatively, choose Blank Image if you want to create an empty encrypted container to drag files into later.
- Choose an encryption strength 128-bit AES is fine for most purposes, though 256-bit AES is available for more sensitive material and has no meaningful downside on modern hardware.
- Set a password when prompted, and decide whether to save it in your Keychain (convenient, since your Mac will remember it) or not (more secure, but you’ll need to enter the password every time you want to open the file).
- Choose a disk image format. Read/write lets you add and remove files after the fact; compressed is read-only once created but takes up less space.
- Once created, the encrypted disk image behaves like an external drive icon on your desktop. Double-click it, enter your password, and it mounts as a regular folder you can open and use. When you’re done, eject it like you would a USB drive, and it locks back up.
Option 2: Password-protected ZIP archives. Mac OS’s built-in Archive Utility doesn’t support password protection directly, but free tools like Keka or the cross-platform 7-Zip (also available for Mac) let you create password-protected, AES-256-encrypted ZIP or 7z archives the same way described in the Windows section above. This is the better option if you need to send the encrypted file to someone on Windows, since they won’t need any special software to open a standard encrypted ZIP.
Cross-Platform Tools Worth Knowing
If you regularly move files between a Mac and a PC, or you want one consistent method regardless of which machine you’re on, a couple of free, well-regarded tools are worth setting up once.
Vera Crypt is a free, open-source disk encryption tool that works identically on Windows, macOS, and Linux. It lets you create encrypted “containers” files that look like ordinary files from the outside but mount as a virtual encrypted drive once you enter the correct password. It’s a good fit if you want a single encrypted vault you can carry on a USB drive and open from any computer, since the software itself is portable and doesn’t require installation on every machine you use it on.
Cryptomator takes a slightly different approach, designed specifically for encrypting files that live inside cloud storage services like Dropbox, Google Drive, or OneDrive. Cloud storage providers can technically access your files on their servers unless you’ve encrypted them yourself first, and Cryptomator solves exactly that problem: it creates an encrypted “vault” inside your cloud folder, and only files you’ve explicitly added to that vault get encrypted before they’re uploaded. It has free apps for both Mac and Windows, plus mobile apps for reading encrypted files from your phone.
Encrypting Cloud Backups and Sync Folders
It’s worth calling this out separately, because it’s an easy blind spot. Turning on FileVault or BitLocker protects the data sitting on your laptop’s physical drive, but it does nothing for a copy of that same file sitting in Dropbox, Google Drive, iCloud, or OneDrive. Those services generally encrypt data in transit and at rest on their own servers, but the provider itself typically retains the technical ability to access unencrypted content, whether for legal compliance, account recovery, or internal processes, unless you’ve added your own layer of encryption first.
If you have sensitive files syncing to cloud storage tax documents, medical records, business contracts running them through Cryptomator or storing them in a VeraCrypt container before they sync gives you a layer of protection that exists independently of how well the cloud provider secures their own servers.
A Few Practical Things That Trip People Up
Your password is doing more work than you think. Both BitLocker and FileVault, in their default configurations, rely on your regular login password (plus, for BitLocker, potentially a TPM chip and PIN) to protect access. A weak, reused, or easily guessable password undermines all of this. If your login password is something short or predictable, this is a good moment to upgrade it to something longer and stored in a password manager rather than something you type from memory.
Recovery keys need to live somewhere other than the encrypted device. This is the most common way people lock themselves out permanently. If your only copy of a BitLocker or FileVault recovery key exists as a file on the same drive it protects, and that drive fails or the encryption process itself goes wrong, the key is gone along with everything else. Print it, write it down, or store it in a password manager’s secure notes anywhere physically or digitally separate from the machine itself.
Cached credentials matter as much as your files. This is worth flagging specifically for 2026, given how much work now happens through browser tabs and desktop apps that stay logged in. Video calling and chat tools frequently cache authentication tokens and message history locally on the device for performance. If a stolen laptop’s disk encryption gets bypassed through the TPM-interception method described earlier, or simply because the laptop was unlocked when it was taken those cached tokens can potentially let an attacker access connected accounts without ever needing your password again. Locking your screen every time you step away, and using your operating system’s remote-wipe or “find my device” features if your laptop supports them, is a meaningful second layer worth setting up alongside encryption itself.
Encryption doesn’t protect against malware or a compromised account while you’re logged in. Full-disk encryption protects your data when the laptop is off, locked at the boot screen, or physically removed and accessed elsewhere. It does not stop malware running while you’re logged in, nor does it stop someone who’s guessed or phished your actual account password from simply logging in normally and browsing your files, since at that point the drive has already been unlocked by your login.
Older or budget laptops sometimes lack the hardware for automatic full-disk encryption. Device Encryption on Windows Home specifically requires a TPM chip and certain firmware settings. If your laptop is a few years old, especially a budget model, it might not qualify, and Settings will simply not show the Device Encryption option at all. In that case, VeraCrypt is the practical fallback for full-disk-style protection.
Encrypting an existing drive takes real time. Turning on BitLocker or File Vault on a laptop you’ve been using for years means encrypting everything that’s already stored on it. Depending on how much data is there and how fast your drive is, this can take anywhere from under an hour to most of a day. Both systems let you keep working normally while it happens.
Putting It All Together
For most people, the practical setup looks like this: turn on BitLocker (with a PIN, not TPM-only) or FileVault as your baseline, since it’s free, built-in, and protects you against the most common real-world scenario a lost or stolen laptop. Back up the recovery key somewhere separate from the machine the moment you set it up, before you have a chance to forget. Then layer on file-level encryption, using 7-Zip archives, EFS, or an encrypted disk image, for anything specific you’re planning to share, back up to the cloud, or want protected even from someone who might get past your login screen. If cloud sync is part of your workflow, add Cryptomator or a VeraCrypt container for anything genuinely sensitive that’s heading up to Dropbox, Google Drive, or similar. And if you travel with your laptop regularly, a physical cable lock is a cheap, low-tech addition that pairs surprisingly well with all of the above.
None of this takes more than half an hour to set up properly, and once it’s running, it’s almost entirely invisible in day-to-day use you won’t notice your files are encrypted until the day it actually matters, which is exactly the point.